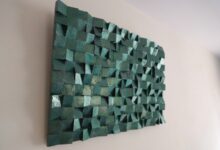
How to install 3D fluted acoustic wood wall panels is not just a guide; it’s an invitation to transform your space into a sanctuary of sound and style. These innovative panels harmoniously blend aesthetics with functionality, elevating interior design while enhancing acoustics. Imagine turning a simple wall into a statement piece that absorbs noise and refines the ambiance of any room.
From studios to living rooms, the benefits of acoustic wood panels are profound. Crafted from high-quality materials, these panels not only add a touch of elegance but also serve as effective sound dampeners. Understanding the installation process is key to unlocking their full potential, making your environment not only visually appealing but acoustically balanced.


Introduction to 3D Fluted Acoustic Wood Wall Panels
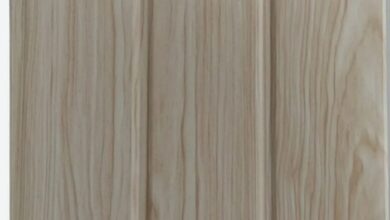
D fluted acoustic wood wall panels represent a fusion of form and function in modern interior design, enhancing both aesthetics and sound quality in residential and commercial spaces. These innovative panels feature a unique three-dimensional fluted texture that adds depth and character to walls while effectively managing sound reflections.The benefits of incorporating acoustic wood panels into interior spaces are numerous.
They not only improve the acoustic comfort of a room by reducing echo and noise, but they also contribute to an eco-friendly design ethos. The natural materials used help to create a warm and inviting atmosphere, making spaces more enjoyable and conducive to activities such as conversation, music, and relaxation.
Materials Used in Acoustic Wood Panels
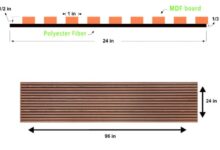
The manufacturing of 3D fluted acoustic wood wall panels typically involves a variety of sustainable materials that enhance their acoustic properties. The key materials include:
- Engineered Wood: This is created by binding together wood strands, fibers, or veneers, providing enhanced durability and stability compared to solid wood.
- Natural Wood Veneer: Thin slices of real wood are used to cover the surface, offering an authentic appearance while maintaining lightweight characteristics.
- Acoustic Foam: Often integrated into the backing of the panels, this material absorbs sound waves, significantly improving sound quality in the space.
- Recycled Materials: Some manufacturers incorporate recycled wood fibers or composite materials, aligning with sustainable design practices.
The combination of these materials ensures that the panels are not only visually appealing but also functionally effective in controlling sound within various environments. The design flexibility they offer allows for customization in color, texture, and size, making them suitable for a wide range of interior styles, from contemporary to rustic.
“The right materials enhance both the aesthetic and acoustic performance of your space, making wood wall panels a smart choice for modern interiors.”
Tools and Materials Required for Installation
When planning to install 3D fluted acoustic wood wall panels, having the right tools and materials is essential for a successful and efficient project. These elements not only ensure proper application but also contribute to the overall aesthetic and acoustic performance of the panels. To assist you in your installation journey, we’ve compiled a comprehensive list of necessary tools and materials, ensuring you are well-equipped for the task at hand.
Essential Tools for Installation
A variety of tools are required to effectively install acoustic wood wall panels. Each tool plays a specific role that facilitates the installation process and ensures a flawless outcome.
| Tool | Description |
|---|---|
| Level | Ensures panels are installed evenly and horizontally. |
| Measuring Tape | For accurate measurements of both walls and panels. |
| Utility Knife | For precise cutting of panels as needed. |
| Drill | Used for drilling holes for screws and fasteners. |
| Screwdriver | For securing panels with screws into the wall. |
| Safety Gear | Includes goggles, gloves, and a mask for protection during installation. |
Materials Required for Installation
Beyond tools, the right materials are crucial for achieving a durable and aesthetically pleasing installation. Here’s what you’ll need:Before diving into the specifics, it’s important to select high-quality materials that are compatible with your acoustic wood wall panels to enhance performance and longevity.
| Material | Description |
|---|---|
| Acoustic Wood Wall Panels | The primary material that provides sound absorption and aesthetic appeal. |
| Adhesive | Strong construction adhesive for securing panels to walls. |
| Fasteners | Screws or nails for additional support during installation. |
| Wood Filler | To fill in any gaps or imperfections for a smooth finish. |
| Paint or Stain (Optional) | For customizing the finish of the wood panels according to your design preferences. |
Preparing the Wall Surface
Before embarking on the installation of 3D fluted acoustic wood wall panels, it is essential to ensure that the wall surface is adequately prepared. A well-prepped surface not only facilitates a smoother application process but also enhances the aesthetic and acoustic performance of the panels. This phase is critical in achieving durability, alignment, and overall visual appeal.
Evaluating the wall surface involves a thorough inspection to identify any imperfections that may hinder the panel installation. Key considerations include checking for unevenness, dirt, and moisture levels. These factors can significantly impact the adhesion of the panels, leading to potential issues in the future. It’s advisable to follow a systematic preparation process that includes cleaning, leveling, and priming the surface to create an optimal foundation for the panels.
Wall Surface Evaluation and Preparation Steps
An effective preparation process consists of several steps that ensure the wall is ready for panel application. Each step plays a vital role in achieving a flawless installation. The following points Artikel the necessary preparations:
- Inspect for Damage: Look for cracks, holes, or any surface damage that may need repair. Use a patching compound to fill in any imperfections.
- Clean the Surface: Remove dust, grease, and other contaminants using a suitable cleanser. A clean surface enhances adhesive performance.
- Level the Surface: Use a level tool to check the wall for straightness. If any areas are uneven, they should be corrected with a leveling compound.
- Moisture Check: Ensure the wall is dry. Excess moisture can lead to mold and can affect adhesion. A moisture meter can help in assessing humidity levels.
- Apply Primer: If necessary, applying a primer can improve adhesion. Select a primer compatible with both the wall material and the adhesive to be used.
Preparing the wall surface properly sets the stage for a successful installation of 3D fluted acoustic wood wall panels. By taking the time to evaluate and address the wall’s condition, the installation will not only be more straightforward but will also yield better results in terms of durability and appearance. Utilizing these preparation steps ensures that the panels are applied to a solid and reliable foundation, enhancing their effectiveness in acoustic performance.
Measuring and Cutting Panels
Accurate measurement and precise cutting are vital for a seamless installation of 3D fluted acoustic wood wall panels. Taking the time to measure correctly ensures a professional finish, while proper cutting techniques prevent material wastage and ensure that each panel fits perfectly within the designated space. When preparing to install your acoustic panels, start by measuring the wall accurately to determine the dimensions required for each panel’s placement.
Use a tape measure to get the height and width of the wall, noting any obstructions like outlets or windows that may affect panel arrangement. It’s crucial to measure in multiple places along the wall, as slight irregularities can occur.
Methods for Accurate Measurement
Begin the measurement process by employing a few key techniques for maximum accuracy:
1. Use a Level
Ensure that your measurements are taken from a level surface. A spirit level can help you gauge if the area is plumb and will lead to a more accurate installation.
2. Mark Reference Points
Use a pencil to lightly mark key reference points on the wall where the panels will be placed. This will provide a visual guide for panel alignment.
3. Create a Template
For more complicated wall shapes, consider creating a cardboard template of the panel. This allows you to visualize the fit before cutting the actual wood.
Techniques for Cutting Panels
Once you have your measurements, the next step is to cut the panels to the specified dimensions. Proper cutting ensures a clean edge and minimizes the risk of damage.
1. Choose the Right Tools
A high-quality circular saw or table saw is essential for cutting wood panels. Ensure you have a fine-tooth blade for clean cuts.
2. Secure the Panel
Before cutting, securely clamp the panel to a flat surface to prevent movement during the cutting process.
3. Mark the Cut Line
Use a straight edge and a marker to draw a clear cut line on the panel. This line will serve as your guide for cutting.
Step-by-Step Guide to Marking and Cutting Panels
Follow these steps for an efficient and accurate cutting process:
Step 1
Measure the required dimensions for each panel and mark them clearly on the wood surface.
Step 2
Using a straight edge, draw a cutting line on the panel.
Step 3
Clamp the panel down to prevent slipping, making sure the cutting line is clear and visible.
Step 4
Cut along the marked line using the appropriate saw. Maintain a steady hand and let the tool do the work.
Step 5
After cutting, sand the edges lightly to ensure a smooth finish, which will enhance the overall appearance of the installation.
Using a template or a consistent cutting guide can greatly improve the accuracy of panel cuts, leading to a more professional-looking installation.
Following these methods for measuring and cutting will not only enhance the aesthetics of your space but also contribute to the acoustic performance of the wood panels, ensuring they fulfill their purpose effectively.
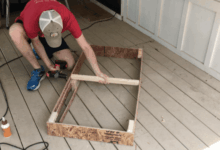
Installing the Panels
Installing 3D fluted acoustic wood wall panels requires careful attention to detail to ensure a sleek and professional appearance. This process involves several crucial steps, including securing the panels to the wall effectively, which can be achieved through various methods. Let’s explore the installation sequence and the best practices that will lead to a successful project.To begin the installation, first, gather your panels and tools, ensuring everything is within reach.
Here’s a straightforward sequence of steps to follow for installing the panels:
1. Start from the bottom
Begin at the lowest point of the wall. This provides a solid foundation for the subsequent panels.
2. Align the first panel
Position the first panel against the wall, making sure it is straight and level, using a level for accuracy.
3. Secure the panel
Depending on your chosen method, apply adhesive or drive screws into the panel to hold it in place.
4. Continue stacking panels
Repeat the alignment and securing process for the remaining panels, ensuring that they fit snugly together.
5. Final adjustments
Once all panels are installed, check for any gaps or misalignments and make necessary corrections.The two primary methods for securing the panels consist of using adhesive and screws. Each has its own advantages and can be selected based on the wall type and panel weight:
Adhesive
Quick and efficient application, offering a clean look without visible fasteners.
Ideal for lightweight panels and smooth, flat surfaces.
Use high-quality construction adhesive to ensure durability and longevity. –
Screws
Provides a more robust hold, especially on uneven surfaces or heavier panels.
Allows easier removal or reinstallation of panels if needed.
Pre-drill holes to prevent the wood from splitting and ensure a secure fit.
Throughout the installation process, it is essential to be aware of common mistakes that can compromise the quality of the finish. A few pitfalls to avoid include:
- Failing to measure accurately, leading to misaligned panels.
- Not using a level, resulting in uneven installations.
- Over-applying adhesive, which can lead to messy excess seeping out from edges.
- Neglecting to consider the expansion and contraction of wood, which can cause warping.
- Skipping wall preparation steps, such as cleaning and priming, which can affect adhesion.
By adhering to these guidelines and avoiding common blunders, the installation of 3D fluted acoustic wood wall panels can transform your space effectively and beautifully.
Finishing Touches
After the installation of 3D fluted acoustic wood wall panels, applying finishing treatments can significantly enhance their appearance while also ensuring longevity. This phase not only beautifies your space but also helps in maintaining the acoustical performance that these panels are designed to provide. Finishing treatments can include staining, sealing, or applying a topcoat to the wood. Each option contributes uniquely to the visual aesthetics and durability of the panels.
Staining allows for custom color options that complement your interior décor, while sealing protects against moisture and wear. A final topcoat can provide additional protection and enhance the panels’ sheen.
Application of Finishing Treatments
When applying finishes to your acoustic wood wall panels, it is essential to follow these steps for optimal results:
Preparation
Ensure the panels are clean and dry. Dust or debris can interfere with the finishing process, leading to an uneven application.
Choosing the Right Finish
Select a stain or sealant that is compatible with wood. Oil-based products offer durability, while water-based products are easier to clean up and tend to have less odor.
Testing
Always perform a test on a small, inconspicuous area to see how the wood reacts to the finish before applying it to the entire surface.
Application
Use a brush or roller to apply the finish evenly. Work in sections to maintain a wet edge, which avoids lap marks.
Curing Time
Allow adequate drying time between coats as per the manufacturer’s instructions to ensure maximum durability.
Cleaning and Maintenance of Panels
Regular cleaning and maintenance are vital to keeping your acoustic wood wall panels looking their best and performing effectively. The following practices can help you maintain their appearance:
Dust Regularly
Use a soft, dry cloth or a microfiber duster to remove dust and prevent buildup. This simple act can help maintain the finish and acoustical properties of the wood.
Avoid Harsh Chemicals
If you’re dreaming of a perfect getaway, consider indulging in luxury beachfront hotels with stunning views. These exquisite accommodations not only offer breathtaking ocean panoramas but also provide unparalleled amenities that make your stay unforgettable. Imagine waking up to the sound of waves and enjoying sunset vistas from your private balcony—it’s the ideal escape for those seeking both relaxation and elegance.
Use gentle cleaning solutions that are specifically designed for wood surfaces. Always test any cleaner on a small area first.
Wipe Spills Promptly
Immediate attention to spills can prevent staining and damage. Use a damp cloth followed by a dry one to avoid moisture buildup.
Inspect for Damage
Regularly check for any signs of wear or damage, such as scratches or chips, and address them promptly to ensure the longevity of the panels.
Ensuring Acoustical Performance
Post-installation, it is essential to ensure that the acoustic performance of the wall panels is not compromised. The following considerations can help maintain their effectiveness:
Monitor Sound Absorption
After your panels are installed and finished, conduct a sound test to evaluate their performance in your space. This can help determine if any additional adjustments are needed.
Evaluate Placement
The location and arrangement of the panels can impact acoustics. Ensure they are positioned in areas that maximize sound absorption, such as near sources of noise or in open spaces.
Maintain Airflow
Ensure that the installation allows for adequate airflow behind the panels. This is important for both the longevity of the wood and its acoustic properties.
If you’re dreaming of a perfect getaway, consider staying at one of the many luxury beachfront hotels with stunning views. These exquisite accommodations not only offer breathtaking ocean vistas but also provide top-notch amenities that elevate your travel experience. Whether you’re lounging by the pool or enjoying a gourmet meal, you’ll find that these hotels redefine relaxation and luxury in every sense.
Regular Maintenance
Continue to monitor the condition of the panels, as wear over time can affect their sound absorption qualities. Reapplying finishes periodically can help restore both appearance and performance.
Troubleshooting Common Issues: How To Install 3D Fluted Acoustic Wood Wall Panels
The installation of 3D fluted acoustic wood wall panels can enhance the aesthetics and acoustics of any space. However, even the most meticulously planned projects may encounter challenges. Recognizing common issues and understanding how to resolve them is crucial for a successful installation. Below, we explore some typical problems you may face during the installation process and provide actionable solutions to ensure a seamless experience.
Panel Warping and Bowing
Warping or bowing of panels can occur due to changes in humidity or improper storage before installation. To mitigate this issue, it is vital to acclimate the panels to the room’s environment prior to installation. Keeping them in the installation area for at least 48 hours allows the wood to adapt to the humidity level, minimizing the risk of warping.If you notice panels that are already warped, consider the following steps:
- Assess the extent of the warping. Minor warps can sometimes be corrected during installation by applying pressure while securing the panels.
- For more significant warping, use a straight edge to determine the best alignment before installation.
- If a panel is too warped to install, replace it with a new one to maintain a uniform look.
Misalignment of Panels, How to install 3D fluted acoustic wood wall panels
Misalignment can occur if panels are not measured or installed correctly. This issue not only affects aesthetics but can also impact acoustic performance. To prevent and rectify misalignment:
- Double-check measurements before cutting any panels. A small error in measurement can lead to significant misalignment once panels are installed.
- Use a laser level to ensure that the panels are aligned correctly both horizontally and vertically. This tool can provide precision that a standard level may not achieve.
- If misalignment occurs during installation, gently remove the affected panel and reapply it while ensuring proper alignment with neighboring panels.
Adhesive Issues
Using insufficient or inappropriate adhesive can cause panels to detach or shift over time. To avoid this scenario:
- Select a high-quality adhesive specifically designed for wood paneling and follow the manufacturer’s guidelines for application.
- Ensure even distribution of adhesive across the back of each panel to promote strong bonding.
- Allow adequate curing time as recommended, avoiding any stress on the panels until the adhesive has fully set.
Surface Imperfections
Uneven or damaged wall surfaces can lead to installation challenges. Before installing the panels, inspect the wall closely. If imperfections are found:
- Fill any holes or cracks with a suitable filler and sand the surface smooth to ensure an even base for the panels.
- For significantly uneven surfaces, consider applying a substrate to create a flat and stable foundation for the panels.
Finishing Touches and Edge Gaps
After installation, gaps between the panel edges and adjoining surfaces can diminish the visual appeal. To address this:
- Utilize wood filler to cover any gaps and ensure a seamless transition between the panels and surrounding surfaces.
- Finish edges with trim or molding that complements the wood panels, enhancing overall aesthetics while concealing imperfections.
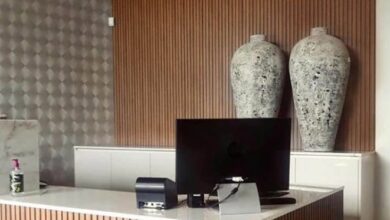
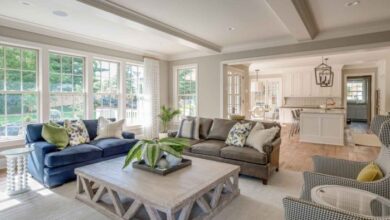
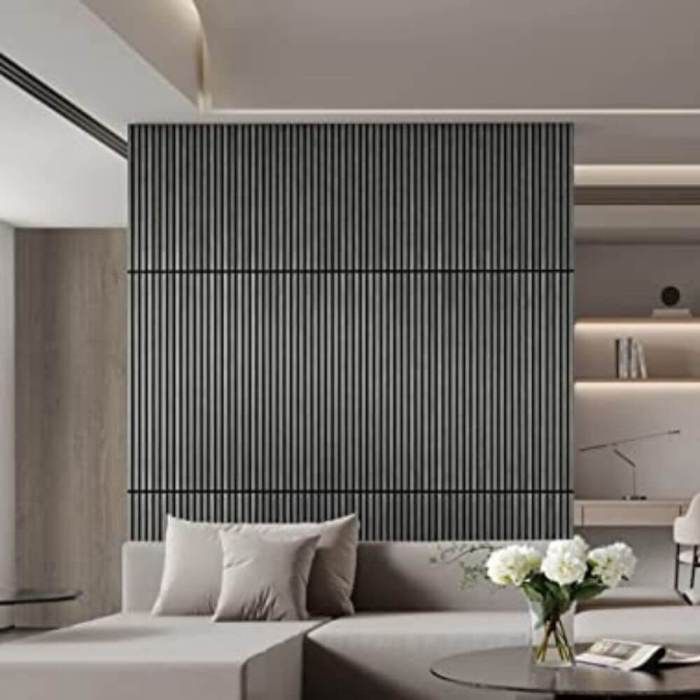
Benefits of Acoustic Wall Panels in Different Spaces
Acoustic wall panels serve not only as a functional element but also as an aesthetic enhancement across various environments. Their primary purpose is to improve sound quality by reducing echo and unwanted noise, making them an essential addition to spaces like offices, homes, and studios. Each setting has unique acoustic challenges, and investing in these panels can lead to significant improvements in both sound dynamics and visual appeal.The impact of acoustic wall panels extends beyond mere noise control; they also contribute to the overall ambiance of a space.
In offices, a quieter environment can enhance productivity and focus. In homes, they can create serene and comfortable living areas. Studios benefit from sound clarity, essential for recording and production. The versatility of these panels allows for a range of designs, catering to the aesthetic preferences of different users while fulfilling acoustic requirements.
Comparison of Benefits for Different Spaces
The following table Artikels the specific benefits of installing acoustic wall panels in various settings, demonstrating how they can transform each space:
| Space Type | Acoustic Benefits | Aesthetic Advantages |
|---|---|---|
| Offices | Reduces background noise, lowers stress levels, improves communication. | Available in various designs and colors to match corporate branding. |
| Homes | Minimizes echo in open spaces, enhances privacy between rooms. | Can be designed to harmonize with home decor, adding character. |
| Studios | Controls sound reflection for clearer recordings and mixing. | Customizable to suit artistic themes while providing functional sound control. |
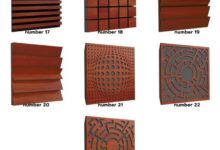
Alternative Acoustic Panel Options
Acoustic wall panels are essential for optimizing sound quality in various environments, from home theaters to professional studios. While 3D fluted acoustic wood panels provide a unique aesthetic and effective sound dampening, there are several alternative options available that may suit different design preferences and budgets. This section explores these alternatives, comparing their acoustic properties, aesthetic values, and overall cost-effectiveness.
Types of Alternative Acoustic Panels
When considering alternative acoustic panels, it’s crucial to evaluate their material composition, design, and performance in sound absorption. Below are some noteworthy options:
- Fiberglass Panels: These panels are made from compressed fiberglass and are highly effective in absorbing sound waves. They come in various shapes and sizes and can be covered with fabric for a more decorative finish. Their ability to absorb mid to high frequencies makes them ideal for recording studios and offices.
- Foam Panels: Acoustic foam panels are lightweight and easy to install. They are particularly effective for controlling echo and reverberation in small spaces, making them popular among amateur musicians. Foam panels offer a range of designs, from wedge shapes to pyramid styles, allowing for creative installations.
- Fabric-wrapped Panels: These panels consist of a core material, often fiberglass, wrapped in decorative fabric. They combine aesthetic appeal with sound absorption capabilities, making them suitable for both residential and commercial spaces. The fabric can be customized in various colors and patterns to match interior design.
- Mineral Wool Panels: Made from natural mineral fibers, these panels are known for their excellent sound absorption properties and fire resistance. They are often used in industrial settings and are effective in reducing noise levels in large areas.
- Acoustic Plaster: A modern solution, acoustic plaster can be applied directly to walls and ceilings. It transforms an existing surface into a sound-absorbing one while maintaining a sleek look. Its seamless application allows for versatile design options, suitable for contemporary spaces.
Understanding the acoustic properties of these alternatives is essential for making an informed choice. For instance, fiberglass panels generally provide superior sound absorption across a broader frequency range compared to foam panels, while fabric-wrapped options balance aesthetic appeal and functionality.
Cost-Effectiveness and Durability
When assessing the long-term value of alternative acoustic panels, cost-effectiveness and durability are key considerations. The following insights elaborate on these factors:
- Initial Investment: Acoustic foam panels are typically the most affordable option, with prices ranging from $1 to $3 per square foot. In contrast, fabric-wrapped panels and fiberglass options can cost between $5 and $10 per square foot, reflecting the higher quality and performance.
- Longevity: Fiberglass and mineral wool panels tend to have longer lifespans than foam panels, which can degrade over time if exposed to moisture or pollutants. Investing in higher-quality materials can reduce the need for frequent replacements.
- Maintenance: Foam panels may require occasional cleaning, but their lightweight nature makes them easy to handle. Conversely, fabric-wrapped panels can be more challenging to clean, especially in high-traffic areas where dust and stains accumulate.
Choosing the right acoustic panel involves balancing upfront costs with long-term functionality and aesthetic integration into your space.
Last Recap
In summary, mastering how to install 3D fluted acoustic wood wall panels not only enriches your interior space but also enhances its acoustic performance. By following the Artikeld steps and being mindful of common pitfalls, you can achieve a seamless installation that transforms your surroundings. Embrace the journey of creating a harmonious environment where beauty meets functionality, and enjoy the lasting benefits of your carefully curated acoustic oasis.